Android Oreo was officially unveiled a couple of weeks ago, and it introduces a lot of new and exciting features. If you haven’t already, you should check the developers website for the list of what’s new in Android O.
One of the really interesting features for developers is the new way to apply fonts right there in your XML files.
That’s great right? Yup. Except that it works out of the box for only API 26 (Android O).
In this post, we will look at how to backport this awesome feature to older versions - down to API 14 using the Support Library 26.
Custom Fonts on Android - Old Ways.
Previously on Android, there were limited ways to use custom fonts on Android. The following techniques are the ones I consider the most popular ways of implementing custom fonts in Android:
1. Custom Views
One would typically need a custom view that extends the equivalent view where trying to apply a font to. In the custom view, one would create a Typeface
and then call setTypeface (or a similar method, that, sets the typeface).
One would also need to have the font file placed in the assets folder.
The code in the custom view typically looks like:
Typeface tf = Typeface.createFromAsset(getContext().getAssets(), "fonts/" + fontName;
setTypeface(tf);
2. Calligraphy Library
Thanks to some awesome developers, there is another approach to having custom fonts in your apps - and the library is called Calligraphy - https://github.com/chrisjenx/Calligraphy. The usage is fairly straightforward, and the pitfalls are clearly identified. But as with every library, it comes with the penalty of adding extra dependencies thereby increasing method count.
Custom Fonts with Support Library - The New Way.
Thanks to the good folk at Google and their work on Android Support Library 26 it is now possible to declare fonts in XML - something called font families, and also programmatically without the need of an extra library besides the support library (which you most likely already use in your app anyway).
How to
In order to implement this feature using the support library, there are a number of short and precise steps one has to go through.
i. Add the fonts to the fonts resource directory
Just like string and drawable resources, the fonts are now available as resources.
First step in making this happen is to add the font files to the res/font folder
in your project. This ensures that they are packaged as resources, and are easily
accessible in a similar way we access other types of resources: @font/niceFont in XML
or as R.font.niceFont in code.
ii. Create a font family
Font family is something that was introduced in Android, and it is used to define a group of fonts and their corresponding style. So the system can determine what font resource to use for regular, bold and italic styles and weight configurations. A typical font family looks like this:
<?xml version="1.0" encoding="utf-8"?>
<font-family xmlns:android="http://schemas.android.com/apk/res/android"
    xmlns:app="http://schemas.android.com/apk/res-auto">

    <!-- regular -->
    <font
        android:font="@font/josefinslab_regular"
        android:fontStyle="normal"
        android:fontWeight="400"

        app:font="@font/josefinslab_regular"
        app:fontStyle="normal"
        app:fontWeight="400" />

    <!-- italic -->
    <font
        android:font="@font/josefinslab_italic"
        android:fontStyle="italic"
        android:fontWeight="400"

        app:font="@font/josefinslab_italic"
        app:fontStyle="italic"
        app:fontWeight="400" />

    <!-- bold -->
    <font
        android:font="@font/josefinslab_bold"
        android:fontStyle="normal"
        android:fontWeight="700"

        app:font="@font/josefinslab_bold"
        app:fontStyle="normal"
        app:fontWeight="700" />

</font-family>
Note
A really important thing to note is that we had to define attributes using both android and app namespaces.
The app namespace is what ensures that the feature is backward compatible.
iii. Using the fonts
Now that we have defined the fonts, we could either use it programmatically, directly in XML layouts, or via a style that will be applied to the view in the layout.
Let’s have a look at how we could use the custom fonts in each case.
a. Using the font programmatically
We can decide to use this font programmatically in a way quite similar to how we
have always been doing, except that we’re not creating this Typeface
from an “asset”. Rather, we’ll be getting it as a resource. Doing this programmatically
(for backward compatibility) will look like:
Typeface typeface = ResourcesCompat.getFont(this, R.font.app_font);
fontText.setTypeface(typeface);
b. Using the font-family directly in the layout file
You can apply this font family created in step ii above directly in the layout file. Using it will look something like this:
<TextView
    android:layout_width="wrap_content"
    android:layout_height="wrap_content"
    android:text="Text"
    android:textStyle="bold"
    android:fontFamily="@font/app_font" />
Something worth noting here is that it appears that one can specify the fontFamily
attribute using either the android or app namespace.
The catch here is that the
android:fontFamily attribute is not available for API levels below API 16, while we’re
trying to backport this feature all the way to API 14.
To go around this, gotcha, we can use the app namespace instead. However, there seems to
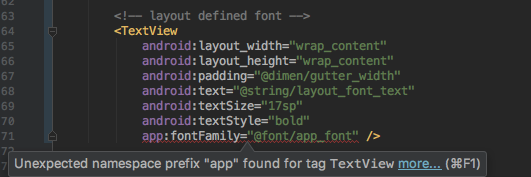
be another interesting discovery: Android Studio flags the app:fontFamily attribute as “Unexpected namespace prefix app found for tag TextView” as seen in the screenshot below,
but it seems to work for me regardless of what AS is saying.
(Dear reader, I’d love to get your feedback if you’re able to reproduce this weird behaviour too).
c. Using the font-family via a style
Another usage of the font family is via a style (or text appearance). We could specify
the fontFamily attribute to use the font family created in step ii, and then in turn
use that as a text appearance or even style in the layout. Defining this in the styles.xml
file will look something like:
<style name="TextAppearance">
    <item name="fontFamily">@font/app_font</item>
</style>
We can now use this TextAppearance style as a text appearance on our textviews accross the app. The usages will look something like:
<TextView
    android:layout_width="wrap_content"
    android:layout_height="wrap_content"
    android:text="Text"
    android:textAppearance="@style/TextAppearance"
    android:textSize="17sp"
    android:textStyle="italic" />
It’s interesting to note that the system is able to pick the appropriate font defined in the
@font/app_font font family resource file that best fits the textStyle given to the view.
Resources and further reading
Summary
In summary, in this post, we have looked at how to implement backward compatible custom fonts in Android using the Support library 26.
-
Want actual code? I have written a sample code that demonstrates everything approach discussed in this post. Feel free to check it out at https://github.com/segunfamisa/android-fonts-xml-sample.
-
Another font-related improvement in Android O worth looking at, in my opinion is the downloadable fonts. This is really cool because it means you won’t have to bundle the font files with the app. Instead, you will specify which font provider (like Google Fonts) you want to retrieve them from, and apply the typeface on the desired view. Check the resources and further reading section for a direct link to the official docs.
Thank you so much for reading this post, please feel free to share if you found it helpful. Also, please feel free to make corrections, suggestions and ask questions in the comment section at the bottom of the page.
Thanks to Efe, Michael and Moyin for reviewing this post. :tada:
Thanks, Segun.